Acoustic Guitar Pedal Board Setup: Looper, Stomp, Reverb & a Secret Wooden Block

Prefer To Read Rather Than Watch?
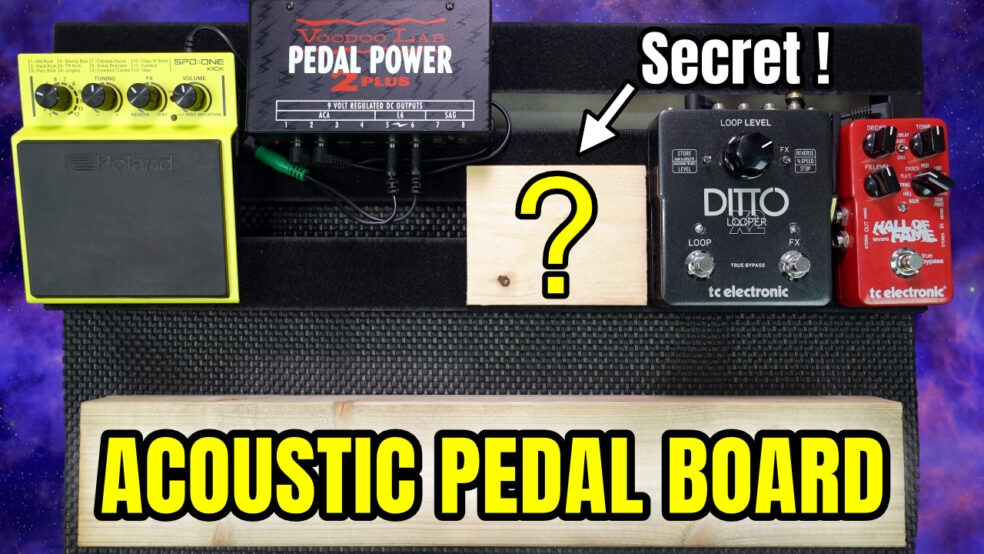
If you’d rather read than watch, this post walks you through my latest acoustic guitar pedal board setup. In the video below, I share how I built the board, why I added a looper pedal for the first time, and the story behind a mysterious piece of wood that turned out to be a game-changer for live gigs.
Whether you’re looking for ideas to upgrade your own acoustic guitar rig, or just curious about how stomp pedals, loopers, and reverb pedals can transform a performance, you’ll find all the details right here.
Video Transcript for "My Acoustic Guitar Pedal Board Setup (Looper, Stomp & A Mysterious Wood Block)"
Introducing My New Acoustic Guitar Pedal Board Setup
In this video, I will walk you through my latest acoustic guitar pedal board setup. I will also explain this mysterious addition to my board. This piece of wood is an extremely useful tool and it’s added a new dimension to performing, so I’ll get into that a bit later.
Upgrading My Stomp Pedal: Roland SPD One Kick vs Horse Kick Pro
Earlier this year, I purchased a new stomp pedal as my previous stomp pedal broke. I also have a video comparing my new Roland SPD One Kick to my Horse Kick Pro stomp pedal which stopped working a while back, so you might want to check out that video to learn more about the two stomp pedals and how they compare.
By the way, I’ll leave links in the description to all the gear talked about in this video.
Why I Never Used a Looper Pedal Live (Until Now)
So, I have never used a looper pedal live as I have always wanted to play everything myself with no previously recorded parts, which includes looped guitar parts. Recently, on a rare night off, I went to see a friend’s acoustic duo and he was using a looper pedal for occasional solos. Seeing the potential of the looper pedal, and after being convinced by Claire (who is the awesome singer I play most gigs with), I did a bit of research and I ordered a looper pedal the next day.
I have used loopers before, although only for a bit of fun and for teaching. The loopers I have used in the past haven’t been that great. The looper on my Kemper for example would never create a useable loop.
No matter how hard I tried to stomp at the right time, the timing of the loop would never be perfect. I think it is due to some sort of latency with the Kemper Remote footswitch or the cat5 cable, but whatever caused the problem, I have never used the looper live.
Why I Chose the TC Electronic Ditto X2 Looper
I purchased a TC Electronic DITTO X2 LOOPER, and this looper pedal is a different beast. The Ditto is awesome, and well-timed loops are super-easy to create. I went for the X2 as the two footswitches allow me to set up a loop early in a song, I can then stop recording whilst I continue playing, and then recall the loop later in the song when I want to rip a solo over the chord changes, add a harmony, or whatever other creative idea I want to try.
I am still getting used to using the looper as it takes practice to get useable results, but it is so much fun being able to play single note solos when playing in my acoustic duo.
Looper Pedal Fails: Learning the Hard Way on Stage
There have been a few awkward moments at gigs when I have forgotten to erase a previous loop, and I burst into a solo over chord changes from a completely different song. Yes, that has happened. I have also miss-hit the footswitch and the loop I thought I had recorded has not been created. So, every day’s a school day.
All this will get better with practice, although in the meantime, it’s quite fun getting out of awkward situations.
Building My Acoustic Guitar Pedal Board with Pedaltrain Metro 24
When I first experimented using the stomp pedal and the looper live, I figured a pedal board would save time when setting up my gear. I found this Pedaltrain Metro 24 board and I hadn’t used for many years, so I decided to use this. I also had a TC Electronics HALL OF FAME REVERB pedal, so I added that to the board as well.
The amp I use when playing solo and duo acoustic guitar gigs is my AER Compact 60. I am currently using the inbuilt delay effect on the amp and the Hall Of Fame pedal for reverb. This is working rather well, although I am still experimenting with my live sound, but it’s great to have different options.
Powering My Acoustic Guitar Pedal Board with Voodoo Lab Pedal Power 2 Plus
Creating the Perfect Footrest for Stomping and Looping
So, I had a plan. One big problem is that the added height of the Pedaltrain board made stomping and looping uncomfortable as the pedals are now far too high off the ground.
To solve this problem, I experimented with various pieces of wood to find the ideal height on which to rest my heel. So, off to the wood yard and a 95mm x 45mm piece of wood, cut to the correct length not only provides perfect heel support, it also fits snuggly in to the underside of the Pedaltrain board so everything fits nicely in the case. Awesome!
DIY Anti-Slip Hack for Pedal Boards and Stomp Pedals
So far so good, although I discovered a big problem at the next gig when using the board and the wood block. A piece of wood placed on a shiny wooden stage slips! Yes, my new wooden heel rest was moving all over the place. It’s difficult enough trying to think about stomping and creating loops, but when your feet are sliding around, it made the gig almost impossible to play.
I thought of many solutions, most of which involved fixing the wooden block to the front of the pedal board, but I then remembered my DIY Doctor Anti Slip Gripper Rolls. I purchased this material to stop my previous Horse Kick Pro stomp pedal from sliding around on the floor. I also use the non-slip material for various recording gear, hard drives, etc., that are on my work desk and to keep them from moving around when I am swapping cables. I cut a piece of the non-slip matting so that it would fit under my pedal board and have the wooden block heel rest sitting on top.
So far so good. A few gigs played with the new setup and my newly required tap dancing to operate the musical toys on my board is going very well.
Using the Ergoplay Guitar Rest for Better Posture and Comfort
It will be a while before I am totally comfortable with stomping and looping as there is so much going on, but with practice, it will only get better and there is so much potential when using my new acoustic guitar pedal board.
One other thing to mention is guitar position when playing live. It’s more important now than ever to have a comfortable sitting position when playing with the added foot stomping requirements. Different venues have chairs of all different shapes and sizes. I always use an Ergoplay guitar rest when playing acoustic guitar as this provides the perfect playing position and eliminates any back problems that you might get from a twisted spine when using a foot stool, or guitar strap, or crossing your legs. I have an older video that demonstrates the Ergoplay guitar rest, so you might want to also check that out.
Power Your Pedals Anywhere: The Long Kettle Lead Hack
Oh, and a 5m kettle lead! Dead cheap and one of those things that I wish I had bought sooner as it saves using extra extension cables if there is no power socket close by.
I simply plug the Voodoo Lab Pedal Power Supply into a socket anywhere up to 5 metres away. As a guitarist, get yourself one or more extra long kettle leads. They are so useful!
The Mysterious Wooden Block: My Secret Stomp Pedal Hack
So, back to the mysterious piece of wood on my board. What’s all this about?
Well, one thing that I have read a few people complain about with the Roland SPD One Kick is that the stomp pedal is very sensitive and it can be triggered if it feels a vibration through the floor. There is a sensitivity control on the side of the pedal to combat this, although I have discovered that I can use this to my advantage. When mounted on the board, the Roland SPD One Kick gets triggered very easily if I tap the board with my foot. I am usually stomping on beats 2 and 4, but I can now add in extra beats with my right foot – genius! Not only that, for fast tempos, two feet stomping keeps a more even tempo and is less tiring than trying to stomp quickly with one foot.
So that’s it, the extra piece of wood is an extra stomp. I also use it to rest my foot on if I am not adding extra stomps. My foot is also right next to the main looper button on the Ditto, so it is very helpful when it comes to using the looper.
Final Thoughts on My Acoustic Guitar Pedal Board Setup
So, there you have it – my new acoustic guitar pedal board. The combination of my Taylor acoustic guitar, AER compact 60 amp and the pedal board works really well, and I am so looking forward to seeing what creative results I can achieve once I gain more experience using it.
I hope you enjoyed this breakdown of my new acoustic guitar pedal board. Please hit that thumbs up button and hit subscribe if you haven’t already as it really helps my channel and is very much appreciated. So see you on the next one and bye for now.
Affiliate links are used throughout this article, which means that I get a small commission in return for any purchases made through them, although it doesn't cost anything extra to you.
Full Acoustic Guitar Pedal Board Setup (Gear List)
Share this Post


